Digital Infrastructure
Overview, specifications and descriptions of each platform.
- CommsLabs Spaces
- Digital Infrastructure Overview and Specifications
- File Space
- Chat space
- CommsLabs.org platform
- Meeting space
- File space guide
- Chat space guide
- Meeting space guide
CommsLabs Spaces
In this section we will present the online spaces inhabited by the CommsLabs community. You can read digital infrastructure overview and specifications for a more detailed technical explanation and the section about roles to understand how the different people in CommsLabs get involved.
CommsLabs Spaces
File Space

On files.commslabs.org, the whole CommsLabs community can store and exchange files (such as travel documents, work templates, resources) safely, as well as work collaboratively on documents for movement organising.
From this platform, administrators can create and manage accounts.
The platform is based on an open source tool called Nextcloud and allows additional features.
Chat space

From more work oriented processes such as group channels for the Coordination Team, Activist Advisory Board and Facilitators to preparing and planning for CommsLabs, to making announcements during the event or just hanging out in the "off topic" channel getting to know each other, the Chat space (a.k.a Mattermost) is where everyone can communicate in a safe, secure and autonomous environment.
CommsLabs.org platform

CommsLabs.org website platform is a safe place for the CommsLabs community to access all relevant information, from the event schedule to principles of participation and orientation on logistics, safety and security. It is also a hub for connecting with the network of participants and facilitators.
Meeting space

Digital Infrastructure Overview and Specifications
Infrastructure specifications
Inception and Design
The CommsLabs digital infrastructure was designed as online spaces to support the CommsLabs events. The idea originated when the CommsLabs were being redesigned to be remote or hybrid events as opposed to fully in person events as they have been held previously. The event required platforms for text, audio and video communication, online storage and simultaneous collaborative document editing, and document publishing. Although commercial and also non-commercial options were available, we decided that hosting our own digital infrastructure was the best approach. We took this decision based on our evaluation of the requirements in terms of privacy, security and digital sovereignty of the activists taking part in the events.
Services
We currently run a series of services in a bare metal server hosted by Hetzner in Germany. Each individual service is hosted in a separate virtual machine using kvm virtualization. The services form the digital infrastructure used in during all phases of the events: inception, design, implementation, evaluation and archival.

At this point, the server hosts the following services:

Nextcloud+OnlyOffice – document storage and simultaneous collaborative editing
Drupal – document publishing
Mattermost – text and audio communication

HAProxy – routing traffic

Firewall – securing access to the individual virtual machines

LDAP – user storage, authentication and authorization

Borg backups – automated backups
Load
The digital infrastructure overall size and load changes through the different stages of the events. During the inception and design, around a dozen users will be active in the platforms, while during the implementation of the actual event this number might jump to up to 80 active users.
Maintenance and Backups
- Backups are done every two hours, sent and stored in a external online storage space.
- Maintenance is performed weekly.
Web design specifications
Download Terms of Reference for Web designer / Graphic designer
File Space
Introduction
The CommsLabs Files space is based on a free/libre open source projected called Nextcloud and can be considered an alternative to Google Suite file storage and editing tools.
Apart from the features described in this page, Nextcloud offers a wide array of features through "apps", generally independent projects that create "mini programs" that can be added onto Nextcloud.
Secure file storage

The File space allows you to safely store and share files and folders through the web platform and/or a desktop or mobile software program (this is called a "client software"). Imagine, for example, someone from CommsLabs travelling. They might benefit from storing sensitive data like their travel documents, information about the event, etc. remotely, in other words, not on their phone, computer or tablet.
These files and folders can be password protected, configured to view only or enable editing and sharing access; or have an expiry date, among other interesting and useful features.
Collaborative documents

Through additional configuration, Nextcloud can work along OnlyOffice to edit directly documents on the platform simultaneously along with other users and each person in their own time. Just as other collaborative documents, Nextcloud allows track changes and comments, as well as the ability to hop backwards and forwards to different versions of the documents.
These documents include text documents, spreadsheets, slide presentations and whiteboards.
User management
In the CommsLabs infrastructure setup, accounts are created and managed through Nextcloud. For more information, view the "Digital infrastructure onboarding guide".
Guides
Wondering how to use this platform? Check out the files guide.
Chat space
From more work oriented processes such as group channels for the Coordination Team, Activist Advisory Board and Facilitators to preparing and planning for CommsLabs, to making announcements during the event or just hanging out in the "off topic" channel getting to know each other, the Chat space (a.k.a Mattermost) is where everyone can communicate in a safe, secure and autonomous environment.
Introduction
The CommsLasbs Chat space is based on a open source projected called Mattermost and can be considered an alternative to Whatsapp and social media platforms.
Apart from the features described in this page, Mattermost offers a wide array of features through "plugins", generally independent projects that create "mini programs" that can be added onto Mattermost.
Communication

From more work oriented processes such as group channels for the Coordination Team, Activist Advisory Board and Facilitators to preparing and planning for CommsLabs, to making announcements during the event or just hanging out in the "off topic" channel getting to know each other, the Chat space (a.k.a Mattermost) is where everyone can communicate in a safe, secure and autonomous environment.
CommsLabs participants can find each others contacts through the Commslabs.org participant directly: each profile includes the participant's chat alias hyperlinked directly to open a conversation with them.
The Chat space also provides the option to share voice messages, files, videos and establish 1:1 or group voice calls.
Guides
Wondering how to use this platform? Check out the Chat manual.
CommsLabs.org platform
CommsLabs.org website platform is a safe place for the CommsLabs community to access all relevant information, from the event schedule to principles of participation and orientation on logistics, safety and security. It is also a hub for connecting with the network of participants and facilitators.
Introduction
CommsLabs.org website is based on a free/libre open source project called Drupal and can be considered an alternative to propietary website creators like Wix and social media platforms.
Apart from the features described in this page, Drupal offers a wide array of features through "modules", generally independent projects that create "mini programs" that can be added onto Drupal.
Schedule

When the specific CommsLabs event agenda has been defined and confirmed, it is published internally (in other words, it can be accessed only if you have an account) on the website so all folk involved, from participants to facilitators, can consult. This schedule allows navigators to filter activities by thematic tracks and date, as well as searching for key words.
Each activity is clickable and leads to its own page with further information and includes access to the facilitators profiles.
The Schedule is a key tool during the event and enhances participation and engagement.
Participant directory

The Participant Directory intends to be a safe space where the whole CommsLabs community can learn more about each individual, easily identifying what sessions they are involved in, what roles they have taken on, what languages they feel comfortable with and how to contact them (via email and/or directly in the Chat space).
Resources

The Resources/Information section on CommsLabs.org provides extensive information about CommsLabs: from historical context, principles of participation, values and politics (such as Healing justice), to platform guides and orientation on logistics, safety and security.
Having all relevant information in one place and only accessible to the community provides a safer and more agile engagement.
Meeting space
Introduction
CommsLabs Meeting space is based on a free/libre open source project called BigBlueButton and can be considered an alternative to Zoom.
Apart from the features described on this page, BigBlueButton offers other features that are described in their official website.
Hybrid event planning
To learn more about hybrid event planning and how to hold and facilitate hybrid convenings/events check Hybrid events guide 101 published by APC.

Guide
Wondering how to use BigBlueButton? Check out the Meeting space guide.
File space guide
Introduction
This guide provides explanations, tips and suggestions for the efficient use of Commslabs's main file repository files.commslabs.org which is based on an open source tool called Nextcloud.
Quick overview
Get familiar with capabilities of Nextcloud from official documentation:
Access
All Commslabs participants, organizers and trainers can access files.commslabs.org with their username and password.
To reset your password visit https://files.commslabs.org/index.php/login next click on Forgot password? link and enter your email address. You will receive the instructions on how to reset password via email.
With this username and password you can also access all other Commslabs platforms.
Personalized access
When you login into files.commslabs.org you will be able to see only the files and folders you have access to.


When you create a folder, subfolder or a file in your home folder you will be able to share it with others or not share it and keep it private.
Create a new folder
Go to the folder you wish to create the document in or your home view and click on the + icon and select New folder. Name the folder and click on the right arrow icon.

Create and upload documents
To prepare a file for document editing or sharing, you can
- upload an existing document or
- create a new one.
Create a new file
Go to the folder you wish to create the document in, click on the + icon and select the type of a document. You can choose between:
New Diagram(.drawio file)New text document(.md file)New document(.doc file)New spreadsheet(.xlsx file)New presentation(.pptx file) .. and others

Upload a document
Go to the folder where you would like to upload a file, click on the + icon and select Upload file.

If you hold down Shift key you can select multiple files. Ctrl + A will select all files in the folder.
Share a file or folder
For the files and folders you create, upload or manage (and sometimes for the files and folders that are shared with you) you can grant access to other people and define how they will be able to interact with them - for example, you can make sure they access it in read only mode or that they are not able to delete it. When you share files and folders the other users may copy, rename, download, move, and share them with other people - just as they can for any other computer file.
Note that access rights are inherited. This means that if you share a folder with someone, they will also have access to subfolders and files contained inside it.

Share files and folders internally with individual users and groups
Once you have entered the name of the person you are sharing the resource with, you can define how they will be able to interact with the resource:
- If you select Allow editing they will be able to access the file and change it. If you don't enable it, they will see the file as read-only (although they can copy and download it).
- Allow creating: allows the user to create new files and add them to the shared resources.
- Allow deleting: allows the user to delete shared files.
- Allow resharing: allows user to share the resource with other people.
- Set expiration date: allows you to set a date after which the resource will stop being available to selected user.
- Note to recipient: allows you to write a meesage to the person who will get the access and sends an email to them.
- Unshare: can be used to remove access when it is no longer needed.
When user has access to the folder you can also send them the Internal link for direct access. To copy it click on the copy icon next to Internal link option.

Share files and folders externally
When you you enable it, the resource will be available to anyone who has the link. Use public link sharing only when necessary - always add a strong password and set an expiration date.
A random 15-digit token will be created. The link will look like https://files.commslabs.org/s/N4n11wsWQFfg75X.
Now you can send the link via email or other channels.

Adjust the settings:
Read onlyto allow viewing and downloadingAllow upload and editing- With
File drop, the sharee can only upload files to a folder without seeing the files that are already in that folder. Hide downloadhides the download buttons and the default browser right-click options in order to make downloading for the sharee harderPassword protectSet expiration datewill automatically disable the sharingNote to recipientUnshareto revert the shareAdd another linkto create multiple public links with different rights
Another option to share the files and folders is via email address. In this case the person will receive a message with a link and instructions on how to access the resources.
Review shared files and folders
If you want to check what is shared with you and what you have shared with others, you can filter the shared files by selecting shares in the left side menu.

Collaborative editing
For working collaboratively on a document we use OnlyOffice that is connected to files.commslabs.org.
OnlyOffice is installed in a separate server – when you click and open on a document, the file is sent to OnlyOffice while you work on it. Then when you save or close the editing tab, the file is sent back to files.commslabs.org.
This process of sending back the file to files.commslabs.org can take a few minutes, so in some cases if you re-open immediately, you won't see the changes. Just wait a few minutes for the updated version to show up.

It is very important that you don't copy the link that you get in the browser's URL.

Prepare a file for collaborative document editing
To prepare the file for collaborative editing follow the steps:
- Upload the document to the repository.

- If it is in OpenOffice format (.odt), you will need to convert it. To do so click on
…and then selectConvert with ONLYOFFICE.

- After the conversion you will have two versions of the document - one in
Open Office format (.odt, .ods)and another inMS Office format (.docx). To avoid confusion which one is there to edit, delete the original(.odt)file.

Tracking Changes
To activate tracking of changes in the file go to Collaboration menu and in the Track Changes dropdown select ON for me and everyone

To review and approve/reject changes made, click on the marked text and Accept or Reject the change in the comment that opens at the side.

Note: Different colors represent different users.
It is possible to navigate through every change using the Next and Previous buttons in the collaboration tab.
To learn more about OnlyOffice comments, check OnlyOffice's official documentation: https://helpcenter.onlyoffice.com/onlyoffice-editors/onlyoffice-document-editor/helpfulhints/review.aspx
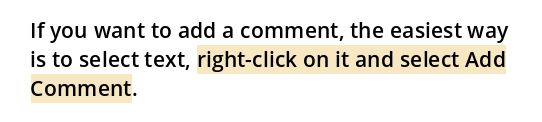
Adding and Managing Comments
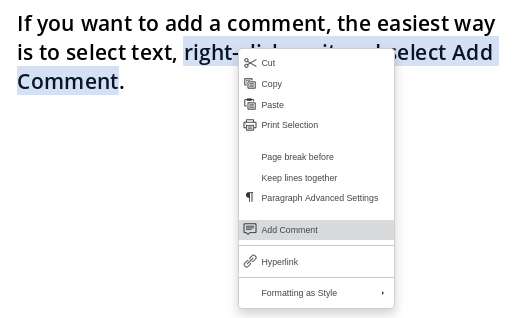
If you want to add a comment, the easiest way is to select text, right-click on it and select Add Comment.
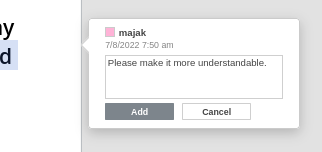
Next, write the comment and click on the button Add.
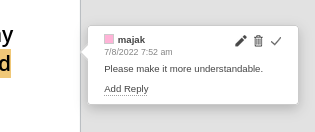
Once a comment has been added, you can reply to it by clicking on the Add Reply button.
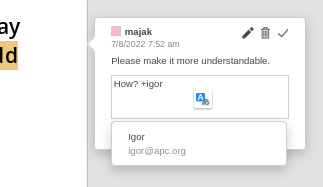
It is possible to mention users in the comments by typing in a + and their username which will be auto-completed.
If the text is commented it will have a different background color and simply clicking on it will display the comments.
All comments in the document can be accessed by clicking on the Comments icon in the toolbar on the left side.
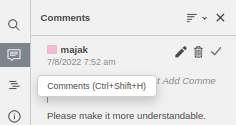
Comments can be approved, making it a useful tool to track which suggestions were accepted and already changed.
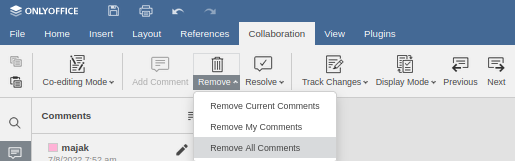
All comments can be removed in one action by going to the Collaboration menu and clicking on Remove All Comments.
Note: If the document is shared as read-only you won’t be able to add comments.
Extra tips for file editing
- To download a copy of the file, select
File>Download as...and select the format. - To quickly get the sharing link of a file from within OnlyOffice, select
File>Open File Location. This will open a new tab folder where the file is located allowing you to copy the sharing link. - When editing a cell in a spreadsheet, use the combination
Ctrl + Alt + Enter/Returnto create a new line without jumping to a new cell. - Note: this feature is unavailable at the moment. You can lock a file so others cannot make changes on it (for example while you are working on it offline) by clicking on the
…and selectingLock file. The file will be locked and other users won't be able to change it until you unlock it, using the same process.
File versioning
If there are major changes to a file, the system keeps older copies. You can see them by click on the …, then Details and Versions. There you can access stored older versions.
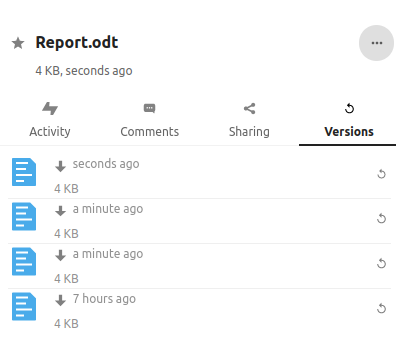
Click on the timestamp to open the file and review contents of the versions.
Be very careful about restoring older versions, as they will overwrite the current one. It is a good practice to review and download the version file before overwriting.
To restore a specific version of a file, click the circular arrow on the right.
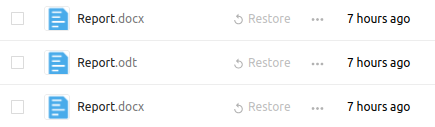
Restoring and permanently deleting a file or a folder
When you delete a file or folder in Nextcloud, it is not permanently deleted. Instead, it is moved into Deleted files folder from where you can restore it. You can find the Deleted files folder at the bottom left of the window in folder view.
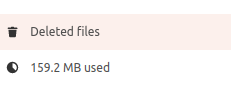
To restore the file or folder click on the Restore icon in the Deleted files folder.
To permanently delete files select ... next to the file name and select Delete permanently.

Check the Deleted Files folder regularly to delete all files and clean up space on the server.
Deleting shared files and folders
When you delete a shared file or folder it will end up in your Deleted files folder and if you are not the one sharing the file or folder it will also be moved to Deleted files folder of the Owner.
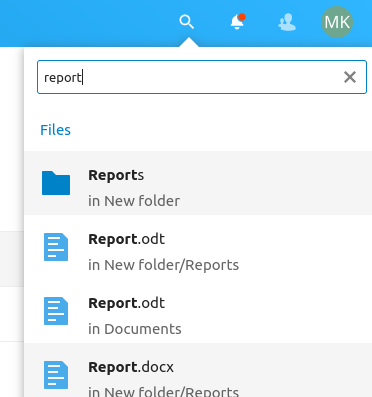
Search
The search functionality is very powerful and can locate files and folders. Run it from your home folder or if you want more specific search, first navigate to a specific folder.
Desktop application
Desktop application offers a convenient way to connect and synchronize files and folders on Nextcloud with your computer. This way it is easy to copy large files into Nextcloud, or move them around. BUT it is also quite dangerous, as you can easily delete files!
You can download a client here: https://nextcloud.com/install/#install-clients
Next install and configure it by entering the server address https://files.commslabs.org/ and your username and password.
Next chose which folders on the server you want to synchronize locally.
The folders that you select will be replicated on your hard disk.
Be super careful: Changes that you make on the synchronized local copies are replicated on the server. Be extra careful when moving or deleting folders! Please contact tech if you need assistance configuring this.
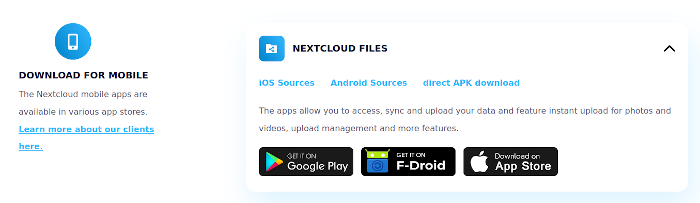
Mobile applications
You can also have access to files.commslabs.org on your mobile phone. The list of all available apps is available at https://nextcloud.com/install/#install-clients.
Select Nextcloud Files next to Download for mobile.
To install the app follow the instructions for Android phone via Google Play. All other apps have the main same settings (and a similar user interface).
To install Nextcloud app go to https://play.google.com/store/apps/details?id=com.nextcloud.client and click on the button Install.
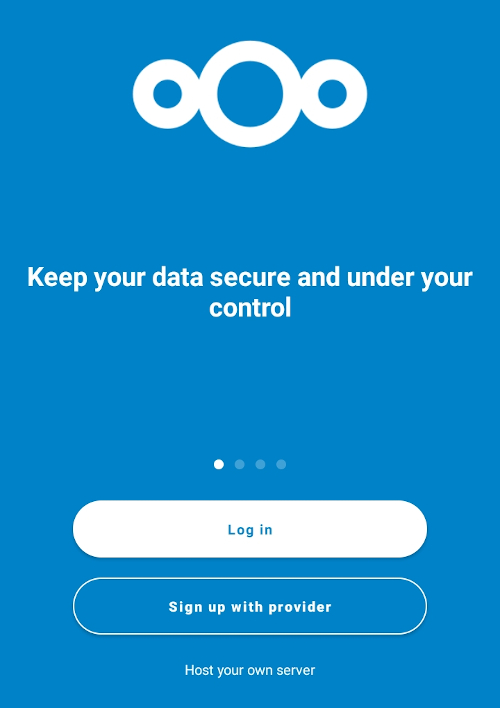
Open the app and tap on Log in button.
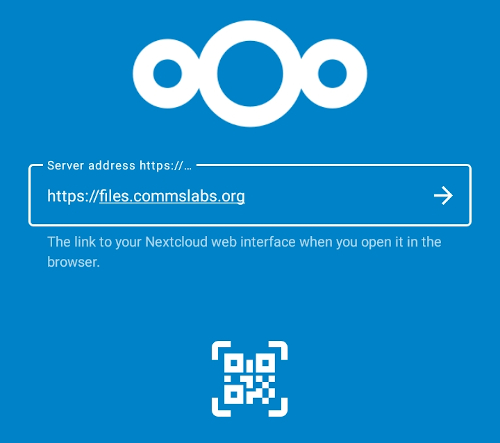
Enter Server address: https://files.commslabs.org.
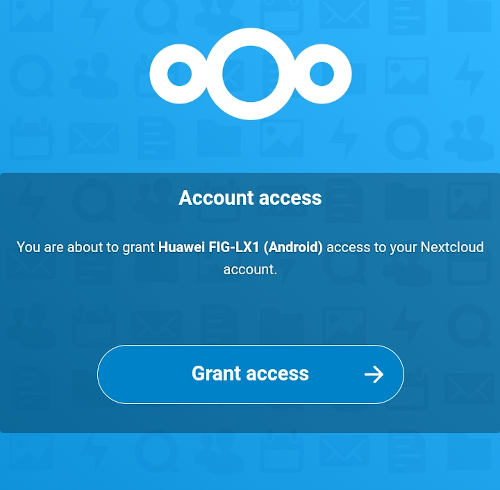
Then click on Log in and enter with your username and password`.
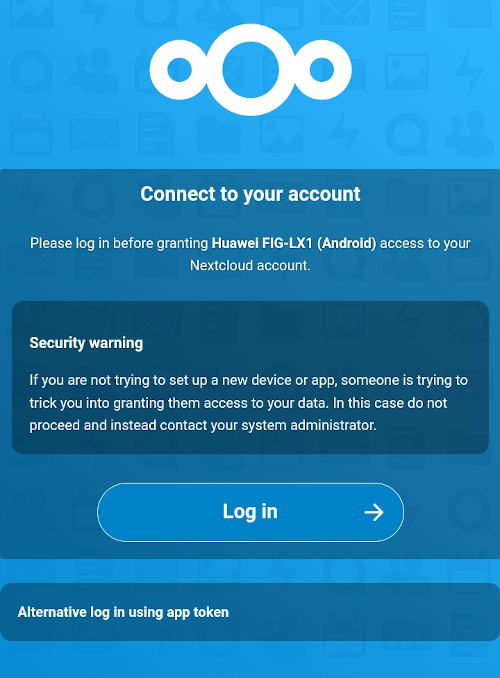
Next click on Grant access.
And allow Nextcloud to access photos, media and other files on your device? You can also choose not to or you grant access at the later date when you need the access.
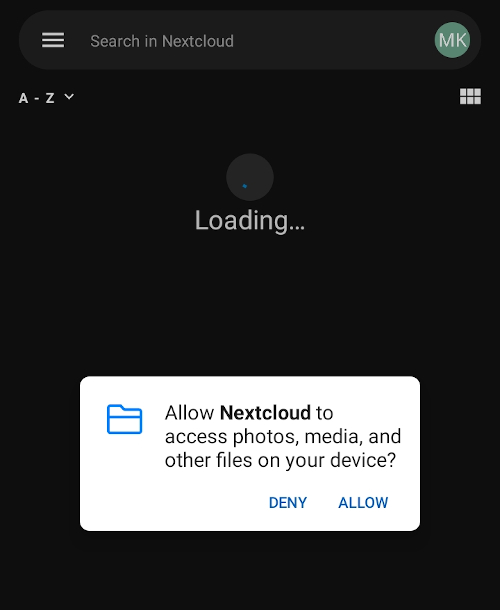
Now app shows all the folders and files you have access to.
Uploading files and photos via app
To upload a photo first navigate to a folder where you want the photos to be saved. Then click on the + icon (bottom right of the screen) and select Upload files or Upload from camera. You can also Create a new folder or create new documents.
Chat space guide
Introduction
Mattermost is an open source application for team collaboration. It runs on Astraea's server, so your conversations are securely stored and data protected. Confidentiality is guaranteed as not even system administrators can access your private conversations.
How to connect?
Simply click on https://chat.commslabs.org and enter your username and password.
If you have forgotten your username and password, you can reset it using your registered email address at files.commslabs.org
To access Mattermost you can also use apps on your phone or desktop. Check available apps at mattermost.com/download/#mattermostApps and use server name chat.commslabs.org and same credentials when logging in.
Channels
Once you login you will see channels (and direct messages) in a sidebar on the left.

Direct messages

Below the channels, you will see your direct messages. You can send a direct message to any person on the platform. You can send Direct messages to just one person or to multiple people at the same time.
Click on the `+` sign to start a new conversation.

Select people you would like to contact and click on Go.

Notify users about the message
When you want to reference someone in a conversation use @ followed by their username, ie @shivi. That person will receive a notification and be informed about the conversation they are a part of. This feature is useful in cases when you have direct messages with multiple people but you want a certain person to be notified about the conversation.
@all and @channel notifies everybody in the channel.
Setup notifications
If you would like to be notified about new messages, you can set up your notification preferences (with or without notification sounds). Click on gear icon next to your avatar.

In Notifications tab click on Edit next to Desktop Notifications, Email Notifications and Mobile Push Notifications and define your preferences.

Send a file
You can send a file by clicking on the clip icon , selecting the file and adding an optional message.

Are you curious about more capabilities of Mattermost? Check out:
Meeting space guide
Quick overview
Get familiar with capabilities of BigBlueButton by watching these quick overview videos:
- Participants (5:33)
- Presenters (9:15)
Additional video tutorials https://bigbluebutton.org/teachers/tutorials/.
Tips for participation
- Sit in a comfortable space.
- Bring a glass of water, tea or similar to stay hydrated (and put it away from the computer to avoid spills).
- Have your device connected to the electricity source or make sure you have your battery fully charged.
- If possible use broadband internet connection and connect to your router/access point with a cable.
- If you are using a VPN you'll have to turn it off, several VPNs block BigBlueButton.
- BigBlueButton runs in the browser. If possible use the latest version of Firefox browser.
- BigBlueButton requires a lot of your device's capacity, it will work best if you close all other tabs in the browser and all other programs running on your device.
- Join the sessions before they start, so we can assist you if you experience any issue.
- Access the sessions with your real name or nickname. You won't be able to change your name unless you join the session again.
- Use headphones with microphone.
- Mute your microphone when entering a session and unmute only when you want to speak.
- Activate your camera only if invited, as too many cameras can make the system slower for everyone.
- To exit the session close the browser tab. You can rejoin the session using the URL that you received.
- If you need a break during the session, take it.
Create a BigBlueButton session
To create a BigBlueButton session click on Sign In button at https://bbb.commslabs.org/ and enter your username and password.

After login you will see the home screen where you can setup the sessions.

To create a new room, click on Create a room field and fill in the desired settings for the room. When the room is created you can copy and send the meeting link and access code and send it to participants. Meeting room can be opened right away or you can wait until the meeting start time.
Join the BigBlueButton session
Warning! There might be some hiccups with some browsers, especially on phones (in general when a phone goes to "sleep" the browser usually stops working), because each Android manufacturer deals with web browsing differently (iPhone should work fine). So, if you encounter problems, please be ready to re-enter the session with another browser.
When you join the session your browser will ask you if you want to join in Microphone or Listen only mode. Select Microphone as to be able to interact.
Select Microphone in the pop up window.

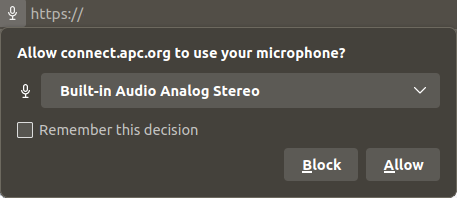
Next you will need to enable microphone by clicking Allow button.
Then you will be able to test your microphone with echo test.
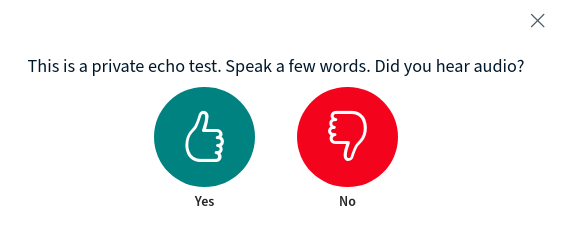
Speak to test the microphone (no one else will be able to hear you) and if you hear yourself, confirm it by clicking on Yes button. If you don't hear yourself select No and you will be able to change your audio settings.

You can use headsets but some operating systems might have "drivers" issues, so be ready to use another set of headsets or the internal audio/microphone of your computer.
Next you will join the session.
Warning! Remember not to use the BACK button in the browser, or you will leave the meeting. If you do, just rejoin and go through echo test again. If you have audio issues during the session (others can't hear you or you can't hear them) click on the headset icon to select a different microphone or speaker.
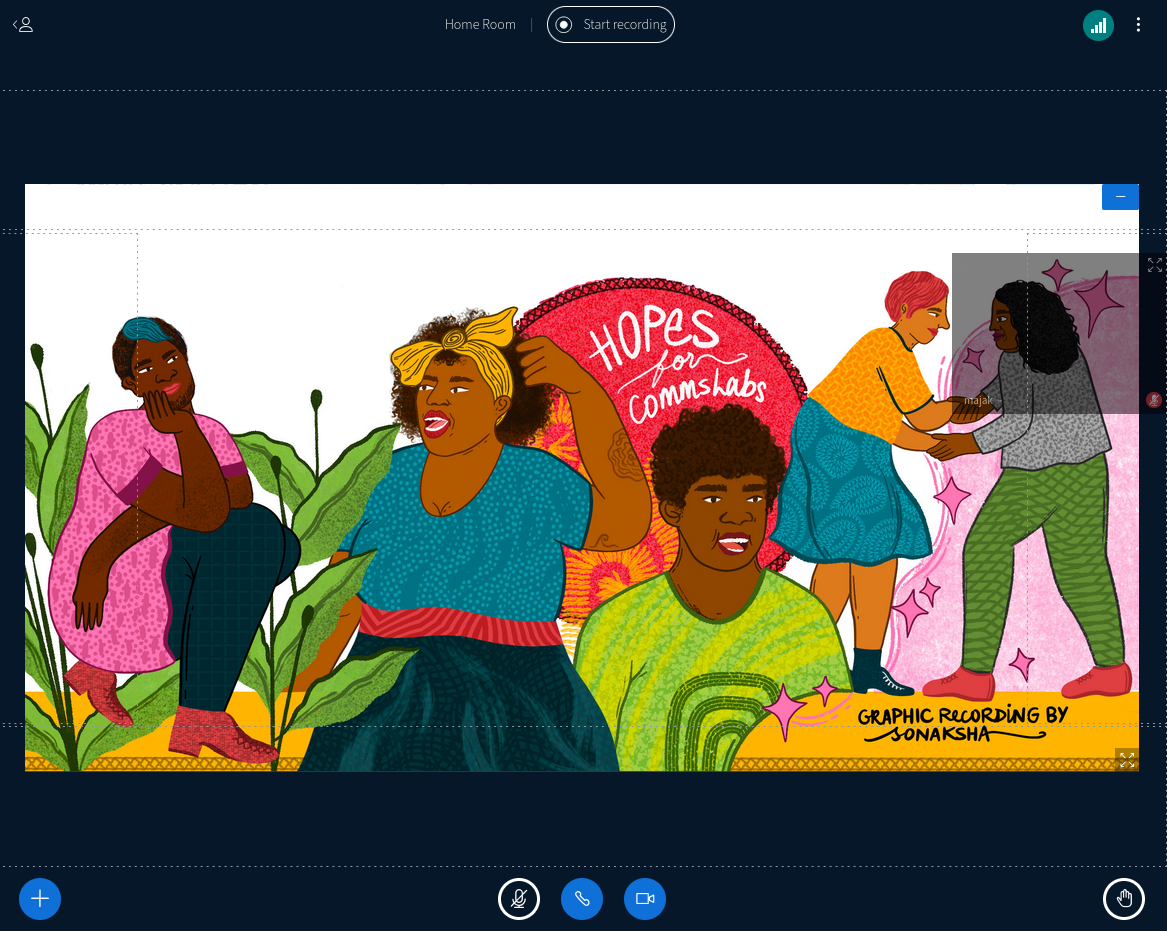
Overview
Let's review the interface and see where you can find the features you will need the most.
The interface
On the left side of the screen you can see participant's list, public chat and access to the shared meeting notes.
In the middle of the screen you will see different things according to the setup (presentation, videos, shared screen, whiteboard, etc.) and you have a lot of control over your own view of the meeting (more on that below in the Video section).
You can use the buttons below the presentation to mute/unmute yourself, leave/join audio, share camera, share your screen, enable interpretation or closed captioning and raise your hand. Some buttons might not be visible due to the settings of the room or your role in the meeting (meeting organizer and presenter have more buttons than participants).
List of participants
You can see a list of all participants in the session on the left hand side of the screen.
Icons will tell you more about the individual's role and their connection status. Moderators have square icons and participants circular. Presenter is only one and has a little presentation icon added. A red dot will appear for muted participants and a green one for those who are unmuted. If the icon is white, audio is not enabled yet and the user can't participate in the conversation.
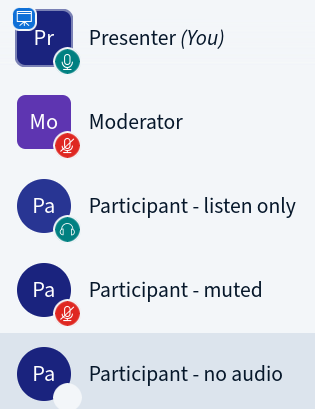
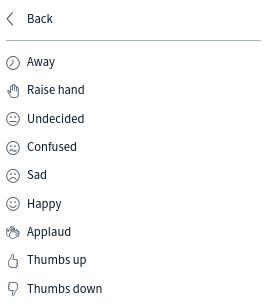
Your own name will be on the top of the list. Click on it to set your status. And a little popup will appear to notify other users about it.
If you click on somebody else's name, you can initiate a private chat (a chat no one else can see). This works even if the person is in another breakout room.
If you are a meeting moderator you can see other features to manage participants, i.e. to make someone presenter, mute/unmute, etc.
Chat
Chat works like you are used to on other platforms, so we will only mention additional functions that you might need.
- In the chat you can write only plain text, but you can use emoticons like :)
- You can also initiate private chats with other participants or moderators of the meeting by clicking their name in the Participants list and selecting Private chat.
- Selecting menu in the top right corner of the chat will give you the option to save the chat (in .txt format) or copy the contents (to the clipboard).
Notes
Control audio and camera
You can use the buttons below the center screen to mute/unmute yourself, reconnect audio (leave and join again), share/unshare camera or share your screen. Some buttons might not be visible due to the settings of the room, and depending if you are meeting organizer, presenter or participant.
![]()
Closed captioning (CC)
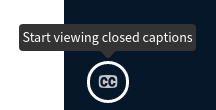
If closed captions are enabled (live subtitles) a CC icon will appear at the bottom of your screen. Click to enable it and select font and color of the subtitles.
Mute and unmute your audio
To mute or unmute you can click on the microphone icon. You can also select mute/unmute in your status (by clicking on your name in the list of participants) or press spacebar on your keyboard.
Reconnect audio
Leaving audio and reconnecting is useful when you encounter issues with your audio, if you connect or change your headphones or when you get back to the main room from a breakout room.
To reconnect audio click on the phone icon and follow the instructions on the screen.

Share camera
- click on the camera icon,
- allow browser to access the camera,
- preview the shared camera image and
- click on the Start sharing button.
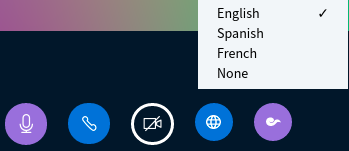
Interpretation
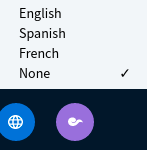
When interpretation is enabled, the blue “globe" icon allows you to choose the language you would like to listen to.
![]()
If the language is being spoken by someone in the session, you will hear the original audio. If an interpreter is speaking in that language, you will hear the interpreter's voice as well as the original audio at the background. You can increase interpreter's volume or original audio volume as it best suits you.
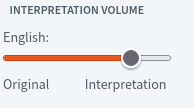
When an interpreted language is chosen, a new slider control will appear on the left side menu, above the list of names. This slider allows you to select the volume of the original language vs the interpreted language. This is particularly helpful when a speaker has a very loud microphone or voice and it is difficult to hear interpretation above it.
If a BBB session's audio is being recorded, the recording will only reflect the original audio or “floor".
Note! Some participants have indicated that when they switch from one interpreted language to another, they can't hear well, but it will certainly work if you switch to the floor sound first and then to the other language channel.
Raise hand

If you click the icon to raise hand in the lower right corner, everyone will be aware that you are requesting to participate. Also, your name will show first in the participants list.
Click on the same icon to lower the hand.
Adjust what you see
When presentation or cameras are shared, you can adjust how they appear on your screen.
Camera
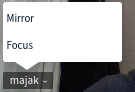
If only one camera view is shared with the presentation you can move the position of the camera view to top, right, bottom or left side of the presentation. To do so hover the mouse over the video and, when cursor changes into a hand, click and move the video to desired location.
If you click the icon to raise hand in the lower right corner, everyone will be aware that you are requesting to participate. Also, your name will show first in the participants list.
Click on the same icon to lower the hand.
Presentation
You can minimize the presentation screen to give more space to cameras by clicking on the icon in the top right corner of the presentation.
You can see it again by clicking on restore presentation icon in the bottom left of the screen.
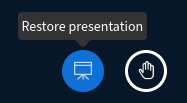
To download the presentation click on the icon in the bottom left of the presentation.

To view the presentation maximized, click on the "Make fullscreen" icon in the right bottom of the presentation.

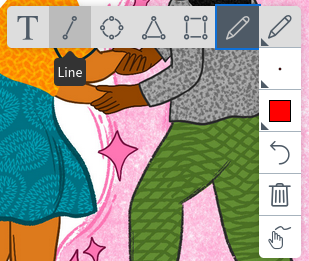
Interaction with drawing tools
If presenter enables this feature you can use various tools to write and draw on top of the presentation. You can select text, line, various shapes and colors and sizes.
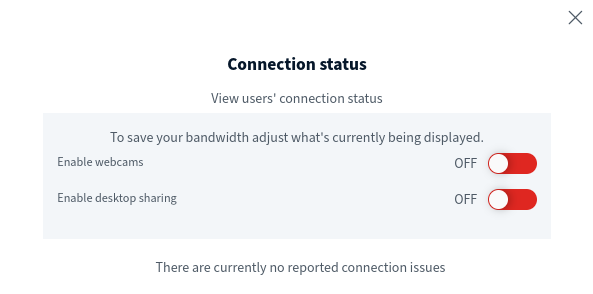
Connection status
A connection status icon at the top right of the screen allows you to see how good connection you have and adjust data usage. This is especially important for mobile phones on slow connections.
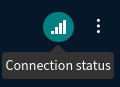
If it becomes red, your bandwidth is not very good at the moment and it is recommended that you click on it and disable cameras and desktop sharing.
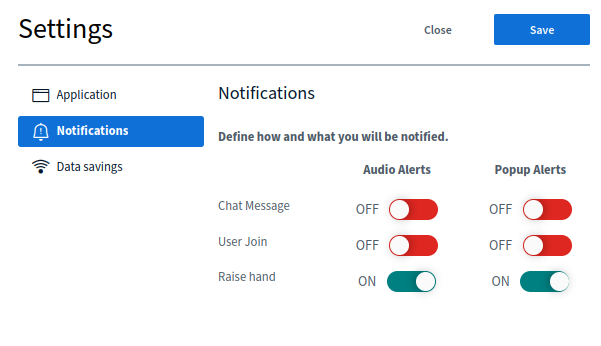
Personal settings
Clicking on three dots icon will open personal settings window that enables you to optimize your experience in BigBlueButton.

Here you can adjust the user interface - animations, audio filters and application language.
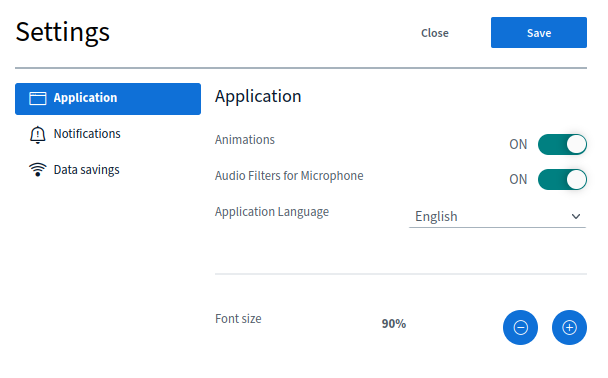
And in the Notifications tab you can adjust audio and popup alerts.
Breakout rooms
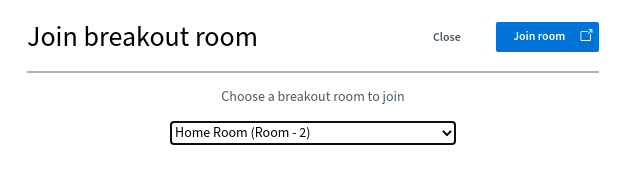
When moderator opens breakout rooms you will receive a notification. If moderator has assigned you to a specific room you will be asked to join that one.
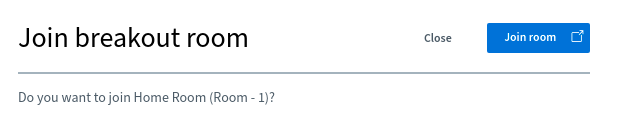
When the choice of which room to join is left to participants, there will be an additional dropdown menu to select the room before you can join it.
When you enter the breakout room you will see time left until the breakout room closes displayed on the top of the window. Other functionalities are similar to the main room (recording is not available though).

To leave the breakout room just close the browser tab or window. If that happens accidentally, moderators in the main room can place you back in a specific breakout room.
When you enter the main room again, reconnect audio and you will be able to participate.
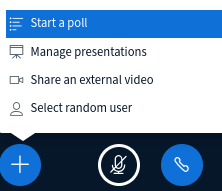
Presenter
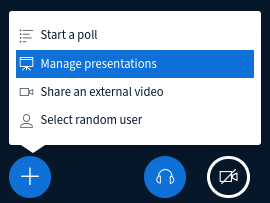
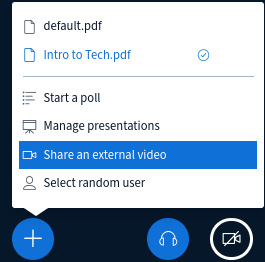
With presenter role you can add presentations, share external videos, share your screen and create and run polls.
Manage presentations
For best results uploading an Adobe Acrobat document (.pdf) document is recommended, although BigBlueButton will accept other file formats, for example Office documents (.doc, .docx, .pptx), text documents (.txt), images(.png, .jpg).
Please note the maximum size is 30 MB or 150 pages per document. You can upload multiple documents as long as they are under the size restrictions.
To upload a presentation first click on the blue (+) button at the bottom and then select Manage presentations.
A window where you can upload your presentation will open.
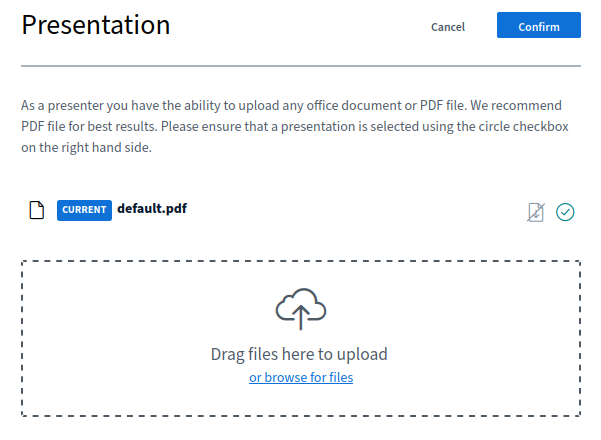
The default presentation is on the top of the list and you can add new ones by dropping them on the Drag files here to upload area or selecting them by clicking the upload area or browse for files link.
After you select the file, it appears on the list with To be uploaded... status
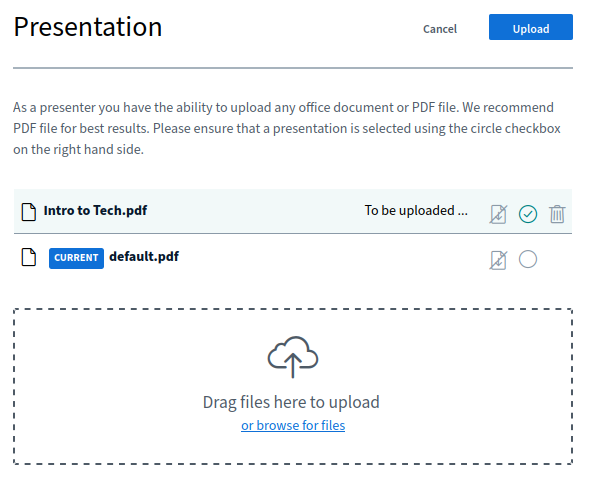
To upload it, click on the Upload button at the top of the screen. It will take a few seconds for the presentation to be uploaded and converted to PDF.
The uploaded presentation will immediately appear in the room (so if you don't want to show it now, load it beforehand or include an empty slide).
If you would like to select or upload another presentation go to blue (+) button again and select Manage presentations. The current presentation has a label CURRENT and a green circle checkbox.
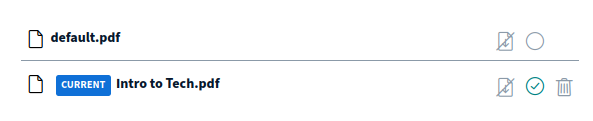
To select another presentation click in the empty circle and click button Confirm at the top of the page.
If you would like the users to be able to download the presentation then enable sharing by clicking on the down arrow icon next to green circle checkbox. The users will now have a little download icon available in the bottom left corner of the presentation.

To remove a presentation click on trash can icon.

You will be able to use additional features to write and draw over the presentation. Review the available tools by clicking on the hand icon on the left side of presentation. If you are the moderator, you can also make these tools available to other participants. Click on the multi-user whiteboard icon at the bottom to enable it.

Share external video
Next, paste the video URL into the text field and click on the button Share a new video.
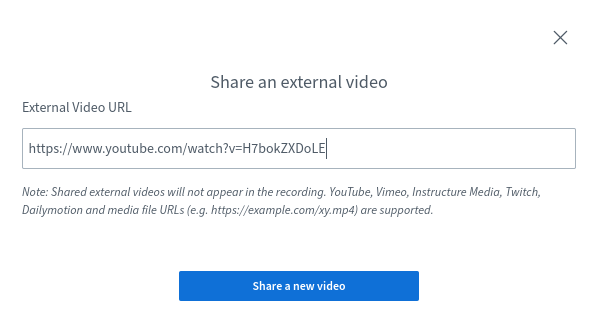
The video will start playing in the main window. Participants can pause and play the video on their screen. Beware that not all participants might see the video as the content of the video might be geo-blocked by YouTube or other services.
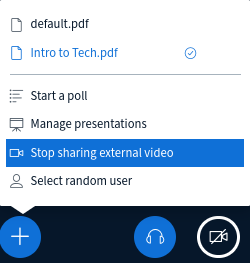
To stop the video click on Plus (+) icon and select Stop sharing external video.
Share screen

When the browser's notification pops up select the screen you would like to share:
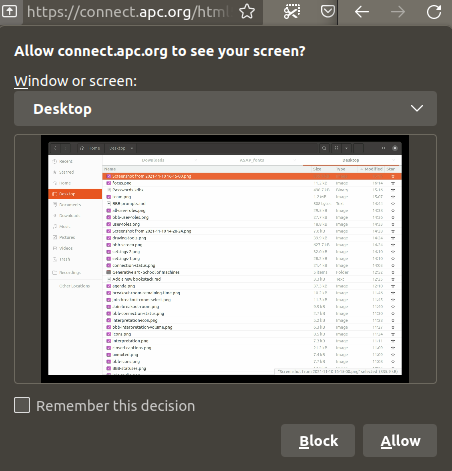
Confirm your choice with a click on the button Allow.
To stop sharing the screen click on the Screen icon again.

Polls
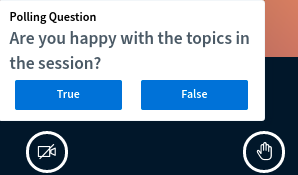
To create a poll click on the blue Plus (+) button and select Start a poll.
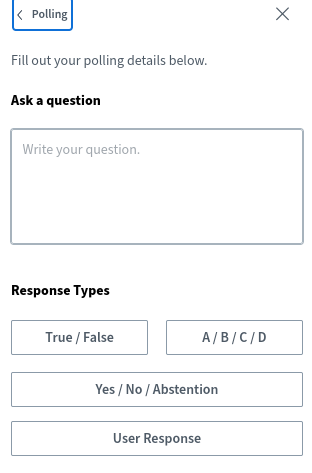
Next you will see a window with poll options. You can select one of the predefined polls or create a custom one.
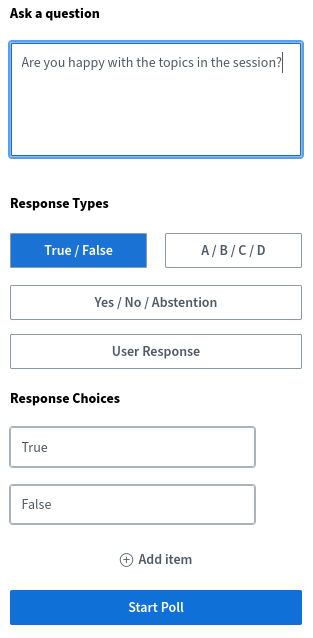
Enter Ask a question text.
Select question type: True/False, ABCD (2 to 4 possible customizable answers), Yes/No/abstention, and open ended (each participant can fill out their answer in free text).
When you are ready click on Start Poll.
Each participant will get a message to answer the poll.
You will be able to monitor the answers.
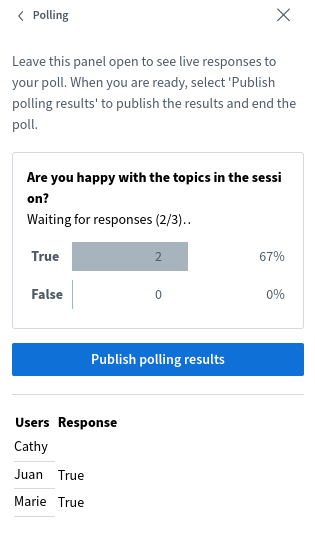
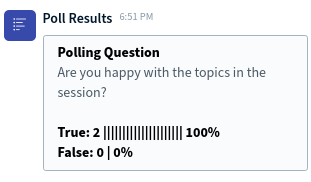
When the poll has ended select Publish polling results and all participants will see the results in a chat.
Moderator
As moderator you have full control of the session and the participants. However if you want to show a presentation or share your screen you will need to take over presenter role too (if you don't already have it).
Recording the session
Moderators of the room will see a button Start recording at the top of the meeting room.
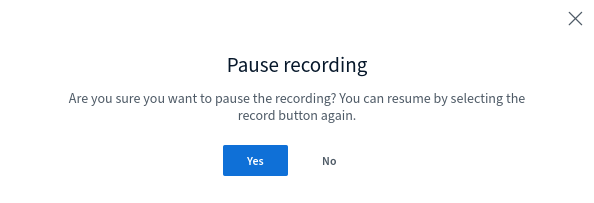
To record, click on the Start recording button.

A pop-up will notify you that you can pause the recording and resume it later. Click Yes to start recording.
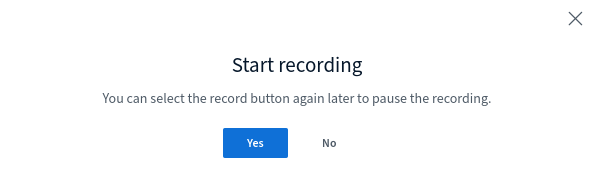
The Start recording Button will change and indicate the length of recording.

To stop the recording click on the button again. After confirming you want to stop recording in the pop-up notification your recording will be stopped.

After you end the meeting the recording will become available on your main room page. It usually takes a few minutes for the recording to be available.
Note: If you record the meeting for one second all the notes and chat will be saved as the result.
Make participant a presenter
As only one user can be a presenter at the same time, user with moderator role will need to assign Presenter role to the user that needs it. Moderator can also take away the presenter role and assign it to themselves.
To give Presenter rights to the user, click on their name in Users list and select Make presenter.
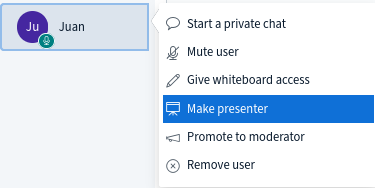
To get Presenter role back, click on your name and select Take presenter.

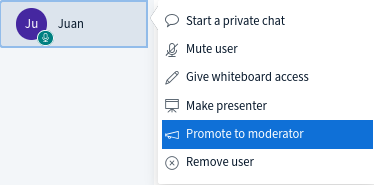
Make participant a moderator
To promote the participant to moderator role click on their name and select Promote to moderator. Now they will have the same rights to manage the room as you have.
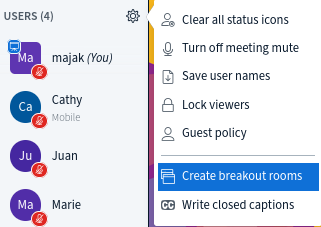
Create breakout rooms
Breakout rooms can be created by clicking on the gear icon in the Users list and selecting Create breakout rooms.
Note! When you enter this menu you cannot manage any other option in BBB until you finalize or cancel the breakout rooms, ie you cannot unmute yourself, nor see the chat. Best practice is to to open another browser tab to create breakout rooms.
Next select the number of rooms you would like to create (between 2 and 16) and assign users to them.
You can drag and drop the users' names, randomly assign them to rooms OR let each choose the room that they want to join. You will also need to define the duration of breakout rooms.

Confirm the settings and open the breakout rooms by clicking on Create button.
The participants will get a notification to join the breakout room. When they join the room a new tab will open in their browser and mute them in the main room. When participants join the breakout room they will see a notification about remaining time on top of the window.
- Participants will also see the last slide of the presentation shown in the main room.
- The first participant to join the breakout room will have the presenter role. You cannot record breakout rooms.
In the main room any moderator can join any breakout room and move around, as well as join “audio only".

Participants can be called back to the main room by the Presenter, or can return by leaving their breakout room, which will bring them back to the main room.
Note! You cannot assign people randomly to rooms if more than one participant is a moderator!
Note! Rooms can end abruptly, even before the warning countdown is done. It's important to save/copy notes, especially since breakout rooms cannot be recorded.
You can send private messages to participants in breakout rooms from the main room.
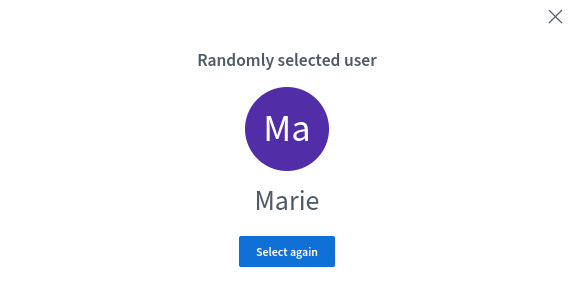
Select a random user
Sometimes you would like to call out a random user and a feature Select random user can help you make a more random selection. Click on the Plus (+) button and Select random user.
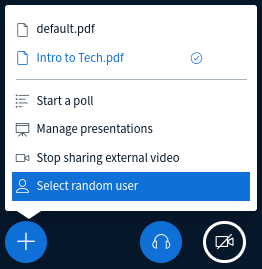
On the screen all participants will see a popup window with a randomly selected user.
Setup interpretation
Session moderator can setup and manage interpretation in several languages.
Activate the interpretation
To start interpretation, click Languages in the left sidebar.
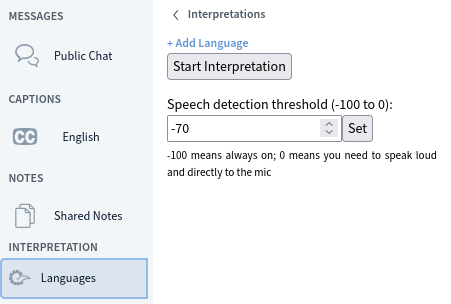
Then introduce the language names (+ Add language) and click Confirm. Define the speech detection threshold for interpreter audio input (between -100 for noisy environments to 0 which means off ): -70 is the default and you can leave it as it is.
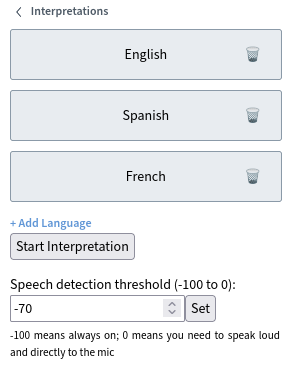
When you are ready, click on Start interpretation.
Participants will see a new globe icon that allows them to select any of the interpreted languages.
![]()
Assign interpreters
In order to assign interpreters, first promote them to moderators: click on their names in the left sidebar, then Promote to moderator.
When they are moderators, they will see a new, purple button to the far right of the bottom menu. They can each select the language they want to interpret into.
When they are interpreting, their mic icon is violet (instead of the normal blue of participants).
Setup closed captions
Meeting moderators can enable close captioning on the meeting.
Select the gear icon and Write close captions.
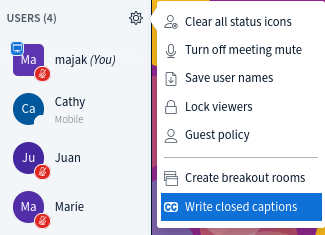
Then select the language.
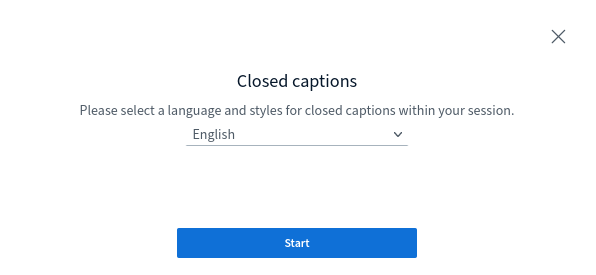
You can start typing text and participants who had enabled CC (clicked on the CC icon) will be able to see the closed captions.

Several people can take turns writing subtitles in the same language.